This tutorial will guide you to write a simple Android app using the available button and text widgets. What our app will do is ask user for his weight and the height and calculate the Body Mass Index (BMI) for him with the information that whether the user is underweight, normal or overweight.
1. Create the Eclipse Project for the Android App
First make sure you have installed the Android Development Tools by following my previous blog post,
Installing Android Development Tools in Windows. After the setup, start eclipse, and click the menu File->New->Android Project.
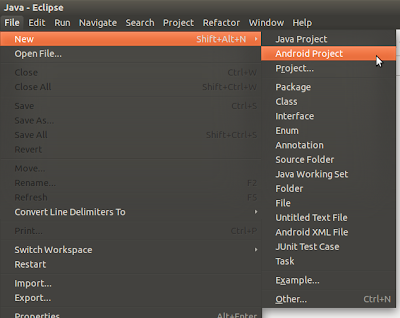 |
| Creating an Eclipse Project for Android Developments |
|
In the "New Android Project" wizard, give a name to your project.
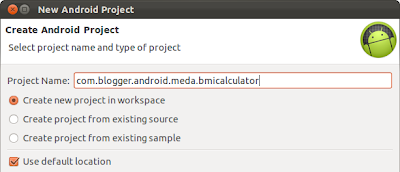 |
| Giving a project name for the Android App |
I'm giving the name "com.blogger.android.meda.bmicalculator". Note my name forms from the package name convention of Java, starts with the opposite sequence of my url parts and then the name for the project. This will uniquely identify my project. Click 'Next' to continue.
Select the Android version you want to run the app. I will keep the Android 4.0 checked.
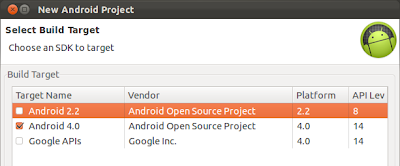 |
| Selecting the Target Android SDK version |
From the next window fill the information as following and click 'Finish' to finalize creating the project.
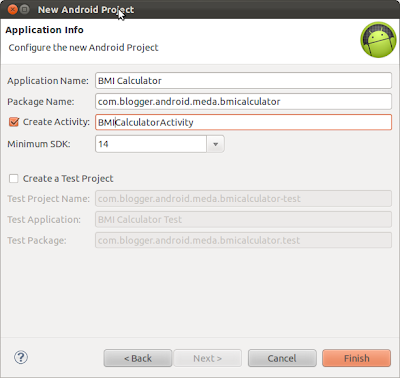 |
| Adding Your Application Information |
2. Design the User Interface (UI)
Designing a (UI) for an android app is very easy. You can do that by simply drag and drop of widgets like text box, buttons into the form in the WYSIWYG editor in Eclipse. To get to the UI Designer double click the res/main.xml file (shown below) under your project from Package Explorer window.
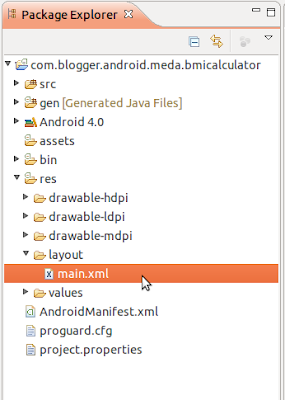 |
| Locating the XML file to design the UI |
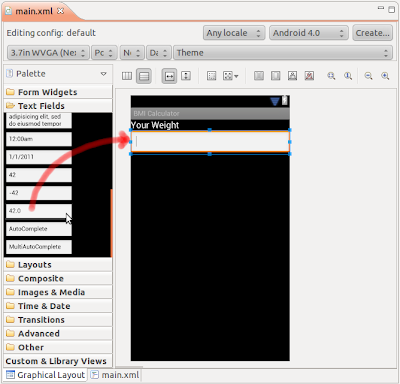
When you open that file by double clicking, you will get to the WYSIWYG (Graphical Layout) editor. You will see there is a hello world greeting has been added by default. Just select the "Hello Wold, BMICalculatorActivity" label and delete it (by pressing the 'delete' button) to clean the form.
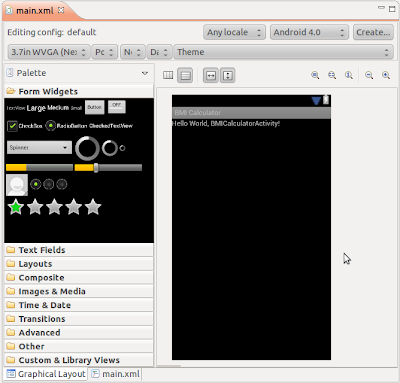 |
| Get Familiar with the UI Editor |
|
Now drag a medium size label widgets from the Platte to the form to get the following look for the UI.
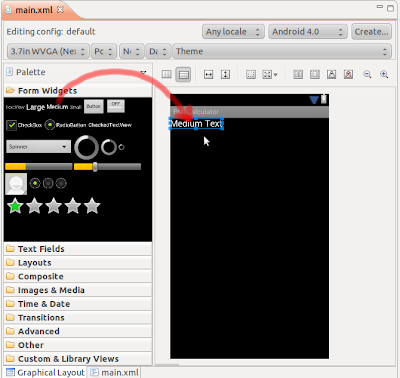 |
| Drag and Drop a Label (TextView Widget) |
To edit the text of the label, right click on it and select "Edit Text...". That will give you the "Resource Chooser" form.
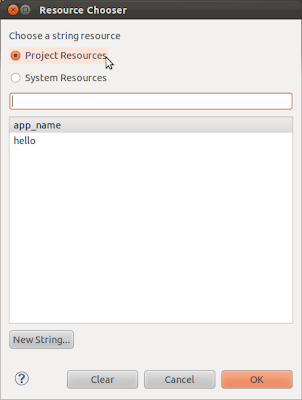 |
| The resource selection panel |
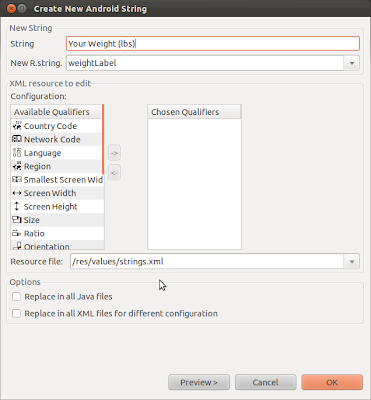
From there, Click 'New String.." at the bottom of the form to declare a new string. This label should contain the String "Your Weight (lbs)". So in the new form put "Your Weight (lbs)" as the String and "weightLabel" as the R.String and click "OK".
 |
| Adding a new string |
Click 'OK' in the Resource Chooser dialog box (make sure the string "weightLabel" is selected) and make sure your label contain the desired string value.
Next Drag a text field to allow user to input the weight. That should be a text field that allow user type decimal numbers (As users enter weight as decimal numbers). For that drag the text field labeled as 42.0 in the Palette to the form.
 |
| Drag and Drop a Text field (EditText widget) |
Right click on the newly added text field and click "Edit ID". That allows you to provide a meaningful names to the text field. (So it is easier to refer them from your code). Give the ID "weightText" and click "OK".
Now add the following widgets to the form in the same order mentioned.
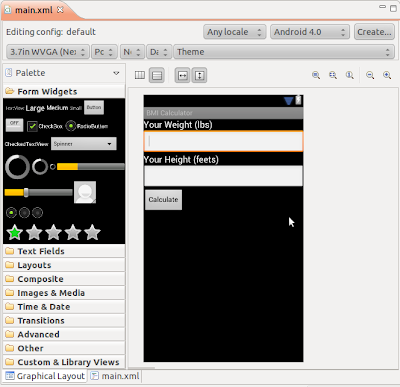
- A "Medium size label" and label with string value "Your Height (feets)" and R.String as "heightLabel". (You have to create a new string resource similar to the "Your Weight (lbs)" label mentioned above.)
- A text field with decimal numbers. Give it the id "heightText". (By right clicking the text field and clicking "Edit ID".)
- A Button. Right click and from the menu click "Other Properties" -> "All By Name" -> "Text" and add a new String Resource (String: Calculate and R.String: calculateButton). Similarly set the "onClick" property (You can choose it by right clicking and selecting "Other Properties" -> "All By Name"->onClick) to "calculateClickHandler". Set the button's id as "calculateButton".
- a Large Label. Give it the id "resultLabel". Set the text property of the label to a empty string. (with the R.String: emptyString)
That is the UI for the BMI Calculator app. Check whether you get the UI similar to this one.
 |
| The final UI for the App |
If you click the main.xml tab in the bottom of the window, you can review or edit the strings and IDs you have associated with widgets. Check whether you got one similar to this one.
<?xml version="1.0" encoding="utf-8"?>
<LinearLayout xmlns:android="http://schemas.android.com/apk/res/android"

    android:layout_width="fill_parent"
    android:layout_height="fill_parent"
    android:orientation="vertical" >

    <TextView

        android:id="@+id/textView1"
        android:layout_width="wrap_content"
        android:layout_height="wrap_content"
        android:text="@string/weightLabel"

        android:textAppearance="?android:attr/textAppearanceMedium" />

    <EditText
        android:id="@+id/weightText"
        android:layout_width="match_parent"

        android:layout_height="wrap_content"
        android:inputType="numberDecimal" >

        <requestFocus />
    </EditText>


    <TextView
        android:id="@+id/textView2"
        android:layout_width="wrap_content"
        android:layout_height="wrap_content"

        android:text="@string/heightLabel"
        android:textAppearance="?android:attr/textAppearanceMedium" />

    <EditText
        android:id="@+id/heightText"

        android:layout_width="match_parent"
        android:layout_height="wrap_content"
        android:inputType="numberDecimal" />


    <Button
        android:id="@+id/calculateButton"
        android:layout_width="wrap_content"
        android:layout_height="wrap_content"

        android:onClick="calculateClickHandler"
        android:text="@string/calculateButton" />

    <TextView
        android:id="@+id/resultLabel"

        android:layout_width="wrap_content"
        android:layout_height="wrap_content"
        android:text="@string/EmptyString"
        android:textAppearance="?android:attr/textAppearanceLarge" />


</LinearLayout>
3. Writing Code for Your App
After designing the UI, we have to write a small piece of code, that trigger BMI calculation when user click the "Calculate" button. This is written in the src/com.blogger.android.meda.bmicalculator/BMICalculatorActivity.java file.
Check the below code and make sure you understand each step properly, specially on how to get references to the widgets in the UI and how to manipulate their texts.
package com.blogger.android.meda.bmicalculator;

import android.app.Activity;
import android.os.Bundle;
import android.view.View;

import android.widget.EditText;
import android.widget.TextView;

public class BMICalculatorActivity extends Activity {
    /** Called when the activity is first created. */

    @Override
    public void onCreate(Bundle savedInstanceState) {
        super.onCreate(savedInstanceState);
        setContentView(R.layout.main);
    }


    public void calculateClickHandler(View view) {
     // make sure we handle the click of the calculator button

     if (view.getId() == R.id.calculateButton) {

      // get the references to the widgets
      EditText weightText = (EditText)findViewById(R.id.weightText);
      EditText heightText = (EditText)findViewById(R.id.heightText);
      TextView resultText = (TextView)findViewById(R.id.resultLabel);

      // get the users values from the widget references

      float weight = Float.parseFloat(weightText.getText().toString());
      float height = Float.parseFloat(heightText.getText().toString());

      // calculate the bmi value

      float bmiValue = calculateBMI(weight, height);

      // interpret the meaning of the bmi value
      String bmiInterpretation = interpretBMI(bmiValue);

      // now set the value in the result text

      resultText.setText(bmiValue + "-" + bmiInterpretation);
     }
    }

    // the formula to calculate the BMI index

    // check for http://en.wikipedia.org/wiki/Body_mass_index
    private float calculateBMI (float weight, float height) {

     return (float) (weight * 4.88 / (height * height));
    }


    // interpret what BMI means
    private String interpretBMI(float bmiValue) {

     if (bmiValue < 16) {
      return "Severely underweight";
     } else if (bmiValue < 18.5) {

      return "Underweight";
     } else if (bmiValue < 25) {

      return "Normal";
     } else if (bmiValue < 30) {

      return "Overweight";
     } else {
      return "Obese";
     }

    }
}
4. Running Your App in an Android Simulator
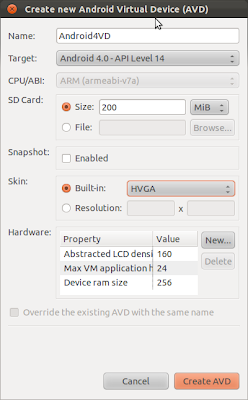
To create a virtual device to run you app, Goto Window -> AVD Manager from the eclipse. Click "New" to create a new android virtual device. Set the configurations similar to the below screenshot and click "CreateAVD".
 |
| Creating an Android virtual device (Simulator) to run your App |
Then right click the project from the "Package Explorer" window and select "Run As" -> "Run Android Application". Wait for sometime till the devices is booted.
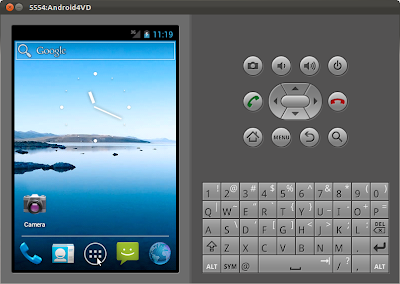 |
| Android Virtual Device |
Then then click the "Application Drawer" of the virtual device at the bottom and click the "BMI Calculator" app.
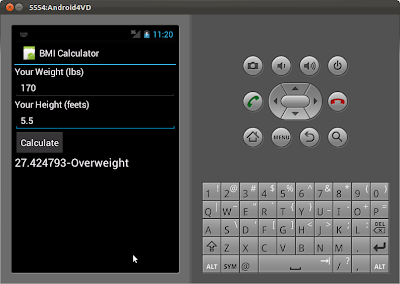 |
| Running our App on Android Virtual Device |
Put your weight and Height in the text boxes and check your BMI. I'm a bit overweight as all (good?) software developers should be:)
5. Running Your App in Your Android Phone
First you have to enable the "USB Debugging" mode in your phone. For that goto Settings -> Applications -> Development and check "USB debugging". And connect your phone to USB port of your computer.
Before launching the app, make sure the app is built with the SDK that compatible with your device. To check that, right click the project name from the "Package Explorer" window (in the eclipse IDE) and click "Properties". Select the Android tab, check the android version of your phone and click OK. And you have to make sure the min SDK version of the AndroidManifest.xml is also correct.
Now click, Run->Run Configuration. From the "Run Configuration" form, select the BMI project (named 'com.blogger.android.meda.bmicalculator') under the Android Application and click Target tab.
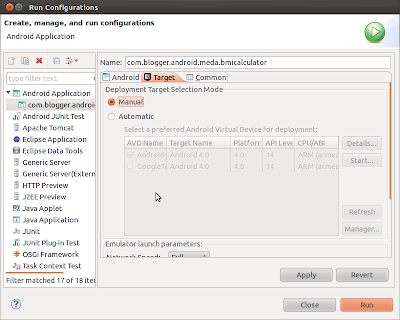 |
| Running the App on a Manual Target (To select run it on the phone) |
From there select "Manual" as the deployment target selection mode (as shown above), and press the "Run" button.
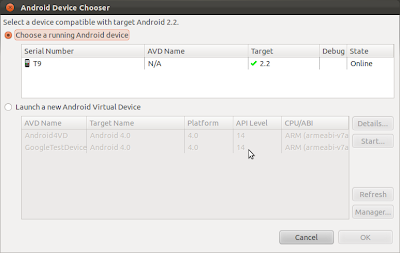 |
| Selecting the phone as the running target |
Then it show the connected android device or devices. Select the one you want to run your app and click the "OK" button. That will launch your app into your phone. Here is a screenshot of BMI Calculor app in my phone.
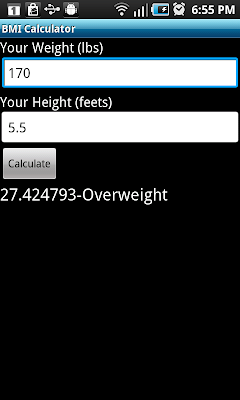 |
| Running the app on the phone |
Hope you had fun developing this nice app and seeing it running on your phone. This is just a start. Hope you explore more and develop more awesome apps!!!
You can download the eclipse project and the android app that we created in this post from following links.
Next Steps
To arrange the widgets in your app using layouts, read
Tutorial: Using Layouts in your Android App. To add an icon to your app, read
Create Launcher Icon For Your Android App. To add themes to the app, read
Tutorial: Theming an Android App.


