This tutorial is to present you how to organise the UI of an android app using layouts. By this time I assume you have a basic idea on how to write a simple app in android. If you have not written a simple app yet, you better follow this blog post first,
Writing Your First Android App - Body Mass Index Calculator and then come back here.
In this tutorial, we would be writing a better looking BMI Calculator. For that I'm using the same eclipse project, used in my
early post on BMI Calculator. But you can follow this tutorial by creating a new project, as we are making this new BMI Calculator from scratch.
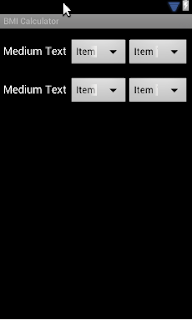
To give a heads up, here is the final UI we are going to create for our App.
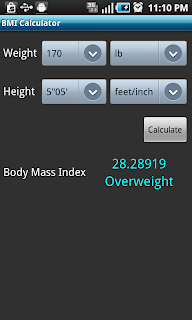 |
| The layout of the target Application |
While creating this simple UI, we would be using several layouts available in Android API.
To learn layout, we would be using the XML editor more than the WYSIWYG (Graphical Layout) editor in our eclipse project. To switch the editors you can go to the GUI file, that is res/layou/main.xml in your project, and click the tabs named 'Graphical Layout' to go to WYSIWYG editor and the 'main.xml' to got the XML editor as shown below.
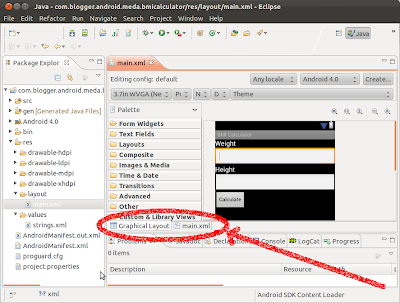 |
| Switching between Graphical Layout(WYSIWYG) and XML edtors |
In the main.xml, you can see the form widgets in your UI, represented as an XML.The names of the XML element, such as TextView and EditText, are the names of the widgets. Each element has properties like layout_width, layout_height represented there as attributes in XML.
layout_width and layout_height defines the width and the height of the widget. It can get either exact value or a relative value based on its content or container. For example, possible values layout_width can get are,
- Number followed by 'px': Number in pixels. In phone screens with higher pixel density, as the size of pixel is small, the widgets will look smaller.
- Number followed by 'dip': Number in density independent pixels. Android provide the unit dip to make sure the widget size is same for different densities of pixels.
- wrap_content: Widgets will be the smallest it can get, limited by the size of the content inside.
- fill_parent/match_parent: Widgets will be largest it can get, limited by the size of the container.
There are different layout we can use to organise the UI widgets in the app, namely Linear Layout, Grid Layout, Table Layout, Relative Layout. We would be using mix of these layout in our example app.
Linear Layout (Default)
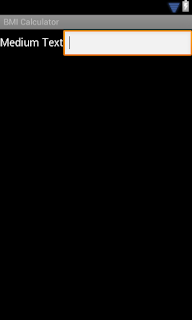
Go to the 'Graphical Layout' editor and delete all the widgets you have got so far. And then add a 'text view' (a label) and a 'text field' as shown below.
 |
| (Vertical) Linear Layout |
Now go to the XML editor and see the corresponding XML.
<?xml version="1.0" encoding="utf-8"?>
<LinearLayout xmlns:android="http://schemas.android.com/apk/res/android"
    android:layout_width="fill_parent"
    android:layout_height="fill_parent"
    android:orientation="vertical" >

    <TextView
        android:id="@+id/textView1"
        android:layout_width="wrap_content"
        android:layout_height="wrap_content"
        android:text="Medium Text"
        android:textAppearance="?android:attr/textAppearanceMedium" />

    <EditText
        android:id="@+id/editText1"
        android:layout_width="match_parent"
        android:layout_height="wrap_content"
        android:inputType="numberDecimal" >
        <requestFocus />

    </EditText>

</LinearLayout>
You can see the TextView and EditText widgets are placed inside the LinearLayout. In the UI, you noticed the widgets are placed vertically one after the other. This is because the layout orientation (the android:orientation attribute underlined in above code) is set to "vertical". If we change it to "horizontal", the widgets would arranged horizontally one after the other. (If you don't have the android:orientation attribute, the LinearLayout will get the default orientation, which is "vertical".)
 |
| (Horizontal) Linear Layout |
In situations where we want to place set of widgets vertically or horizontally, linear layout is an ideal solution. But if we want to align set of items as in a grid or a table, this will not give a good look, because the widgets across columns and rows will not aligned correctly. For that we can use either GridLayout or TableLayout. Since our BMI calculator app requires arrangement of widgets in a grid or a table we would see how we can use each of those layouts. (We will delete all the widgets we added so far, before going to the next section)
GridLayout (For Android 4.0+)
Switch to the XML editor and replace the main.xml content with the following content.
<?xml version="1.0" encoding="utf-8"?>
<LinearLayout xmlns:android="http://schemas.android.com/apk/res/android"
    android:layout_width="fill_parent"
    android:layout_height="fill_parent"
    android:orientation="vertical" >

    <GridLayout
        android:id="@+id/gridLayout1"
        android:rowCount="2"
        android:columnCount="3"
        android:layout_width="match_parent"
        android:layout_height="wrap_content" >

        <TextView
            android:id="@+id/textView1"
            android:layout_width="wrap_content"
            android:layout_height="wrap_content"
            android:text="Medium Text"
            android:textAppearance="?android:attr/textAppearanceMedium" />

        <Spinner
            android:id="@+id/spinner1"
            android:layout_width="wrap_content"
            android:layout_height="wrap_content" />

        <Spinner
            android:id="@+id/spinner2"
            android:layout_width="wrap_content"
            android:layout_height="wrap_content" />

        <TextView
            android:id="@+id/textView2"
            android:layout_width="wrap_content"
            android:layout_height="wrap_content"
            android:text="Medium Text"
            android:textAppearance="?android:attr/textAppearanceMedium" />

        <Spinner
            android:id="@+id/spinner3"
            android:layout_width="wrap_content"
            android:layout_height="wrap_content" />

        <Spinner
            android:id="@+id/spinner4"
            android:layout_width="wrap_content"
            android:layout_height="wrap_content" />

    </GridLayout>

</LinearLayout>
Here we have put 6 widgets in a GridLayout (which is placed inside the LinearLayout container). Note that we have specified the row count and column count in the GridLayout element. So when the widgets are rendered, they will be arranged in the specified columns and rows as shown below.
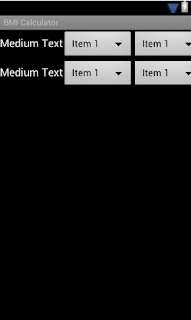 |
| Example of GridLayout |
As you can see, GridLayout is very easy to use layout. But unfortunately this layout is only available in Android 4.0+ versions. My old phone, which is running on Android 2.2 (and many phones used android versions below 4) won't run any app that use GridLayout. So I'm switching to the TableLayout, which do the same thing as GridLayout, but work with any android version.
TableLayout
Now replace the contents on your main.xml with the following code.
<?xml version="1.0" encoding="utf-8"?>
<LinearLayout xmlns:android="http://schemas.android.com/apk/res/android"
    android:layout_width="fill_parent"
    android:layout_height="fill_parent"
    android:orientation="vertical" >

    <TableLayout
        android:id="@+id/tableLayout1"
        android:layout_width="match_parent"
        android:layout_height="wrap_content" >

        <TableRow
            android:id="@+id/tableRow1"
            android:layout_width="wrap_content"
            android:layout_height="wrap_content" >

            <TextView
                android:id="@+id/textView1"
                android:layout_width="wrap_content"
                android:layout_height="wrap_content"
                android:text="Medium Text"
                android:textAppearance="?android:attr/textAppearanceMedium" />

            <Spinner
                android:id="@+id/spinner1"
                android:layout_width="wrap_content"
                android:layout_height="wrap_content" />

            <Spinner
                android:id="@+id/spinner2"
                android:layout_width="wrap_content"
                android:layout_height="wrap_content" />

        </TableRow>

        <TableRow
            android:id="@+id/tableRow2"
            android:layout_width="wrap_content"
            android:layout_height="wrap_content" >

            <TextView
                android:id="@+id/textView2"
                android:layout_width="wrap_content"
                android:layout_height="wrap_content"
                android:text="Medium Text"
                android:textAppearance="?android:attr/textAppearanceMedium" />

            <Spinner
                android:id="@+id/spinner3"
                android:layout_width="wrap_content"
                android:layout_height="wrap_content" />

            <Spinner
                android:id="@+id/spinner4"
                android:layout_width="wrap_content"
                android:layout_height="wrap_content" />

        </TableRow>

    </TableLayout>

</LinearLayout>
Unlike GridLayout, TableLayout does not have rowCount or columnCount, it rather has TableRow element to group the widgets in a single row. If you look at the Graphical Layout (WYSIWYG Editor) to see how it is rendered, you will see it look same as how GridLayout is rendered.
I'm changing above code to do the following modifications.
| To have a margin between rows
|
By adding "marginTop" attribute to the TableRow elements
|
| To have a margin between the vertical edges
|
By adding "marginLeft" and "marginRight" attrbitues to the TableRow elements
|
| To have a margin between TextView and spinners
|
By adding "marginRight" attribute to the TextView elements
|
| To stretch the spinners to get the remaining space |
By setting "layout_width" attribute to "fill_parent" of Spinner elements
|
| In each row, the first spinner should stretch twice as the second spinner. |
By adding "layout_weight" attribute to the spinners, and gravity in first spinner is set to "2" and the second spinner is set to "1"
|
Here is the modified xml (changes are underlined) and the corresponding graphical layouts for both portrait and landscape views.
<?xml version="1.0" encoding="utf-8"?>
<LinearLayout xmlns:android="http://schemas.android.com/apk/res/android"
    android:layout_width="fill_parent"
    android:layout_height="fill_parent"
    android:orientation="vertical" >

    <TableLayout
        android:id="@+id/tableLayout1"
        android:layout_width="match_parent"
        android:layout_height="wrap_content" >

        <TableRow
            android:id="@+id/tableRow1"
            android:layout_width="wrap_content"
            android:layout_height="wrap_content"
            android:layout_marginTop="15dip"
            android:layout_marginLeft="5dip"
            android:layout_marginRight="5dip" >

            <TextView
                android:id="@+id/textView1"
                android:layout_width="wrap_content"
                android:layout_height="wrap_content"
                android:text="Medium Text"
             android:layout_marginRight="5dip"
                android:textAppearance="?android:attr/textAppearanceMedium" />

            <Spinner
                android:id="@+id/spinner1"
                android:layout_width="fill_parent"
                android:layout_height="wrap_content"
                android:layout_weight="2" />

            <Spinner
                android:id="@+id/spinner2"
                android:layout_width="fill_parent"
                android:layout_height="wrap_content"
                android:layout_weight="1" />

        </TableRow>

        <TableRow
            android:id="@+id/tableRow2"
            android:layout_width="wrap_content"
            android:layout_height="wrap_content"
            android:layout_marginTop="15dip"
            android:layout_marginLeft="5dip"
            android:layout_marginRight="5dip" >

            <TextView
                android:id="@+id/textView2"
                android:layout_width="wrap_content"
                android:layout_height="wrap_content"
                android:text="Medium Text"
             android:layout_marginRight="5dip"
                android:textAppearance="?android:attr/textAppearanceMedium" />

            <Spinner
                android:id="@+id/spinner3"
                android:layout_width="fill_parent"
                android:layout_height="wrap_content"
                android:layout_weight="2" />

            <Spinner
                android:id="@+id/spinner4"
                android:layout_width="fill_parent"
                android:layout_height="wrap_content"
                android:layout_weight="1" />
        </TableRow>

    </TableLayout>

</LinearLayout>
 |
| Example of TableLayout (Portrait View) |
 |
| Example of TableLayout (Landscape View) |
As you can see in there the weight of the spinners have no effect on the UI in portrait view as there are no much free space in there, But in Landscape view, the first spinner has stretched twice as the other.
Next we will add a button, for that I will use RelativeLayout.
RelativeLayout
I thought it looks better to add the button right-aligned with the 4th Spinner widget. In such cases, where we want to align a widget relative to another widget (sibling or parent widget), we can use the relative layout. What we do here is replace the spinner4 widget with the RelativeLayout element which contain both the spinner4 and the button. Here is the replacing piece of code (in place of the spinner4 element in the TableLayout example).
            <RelativeLayout
                android:layout_width="match_parent"
                android:layout_height="wrap_content"
                android:layout_weight="1" >

                <Spinner
                    android:id="@+id/spinner4"
                    android:layout_width="fill_parent"
                    android:layout_height="wrap_content" />

                <Button
                    android:id="@+id/button1"
                    android:layout_width="wrap_content"
                    android:layout_height="wrap_content"
                    android:layout_alignRight="@+id/spinner4"
                    android:layout_below="@+id/spinner4"
                    android:layout_marginTop="15dip"
                    android:text="Button" />

            </RelativeLayout>
You can see the button is set to place below the spinner (using "layout_below" attribute), put a margin on top of 15dip (using "layout_marginTop" attribute) and alignRight with spinner4 (using "layout_alignRight" attribute). That will give the following look.
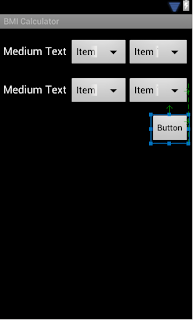 |
| Example of RelativeLayout |
Linear Layout (Nested)
Next we want to add TextViews to show a label, the calculated BMI value and a description. To place that we will be using two linear layouts, one nested inside the other. Here is the xml to get that done. (We add the following code, just behind the end of TableLayout element.
   <LinearLayout
        android:id="@+id/linearLayout1"
        android:layout_width="match_parent"
        android:layout_height="wrap_content"
        android:layout_marginLeft="5dip"
        android:layout_marginRight="5dip"
        android:layout_marginTop="15dip"
        android:orientation="horizontal" >

        <TextView
            android:id="@+id/textView3"
            android:layout_width="wrap_content"
            android:layout_height="match_parent"
            android:layout_marginRight="5dip"
            android:gravity="center_vertical"
            android:text="Medium Text"
            android:textAppearance="?android:attr/textAppearanceMedium" />

        <LinearLayout
            android:id="@+id/linearLayout2"
            android:layout_width="match_parent"
            android:layout_height="wrap_content"
            android:orientation="vertical" >

            <TextView
                android:id="@+id/textView4"
                android:layout_width="match_parent"
                android:layout_height="wrap_content"
                android:gravity="center_horizontal"
                android:text="Large Text"
                android:textAppearance="?android:attr/textAppearanceLarge" />

            <TextView
                android:id="@+id/textView5"
                android:layout_width="match_parent"
                android:layout_height="wrap_content"
                android:gravity="center_horizontal"
                android:text="Large Text"
                android:textAppearance="?android:attr/textAppearanceLarge" />

        </LinearLayout>
    </LinearLayout>
As you can see, from the first LinearLayout, we make two horizontal columns (by setting "orientation" attribute to "horizontal", and adding two children elements). And in the first column, we add a TextView in the center of the vertical space (by setting the "gravity" attribute to "center_vertical". And in the second column, we add another LinearLayout with orientation is set to "vertical", and add two TextViews. They both are horizontally centred by setting the "gravity" attribute value to "center_horizontal".
This will complete our layout arrangement. Finally, It will give the following look in the Graphical Layout editor.
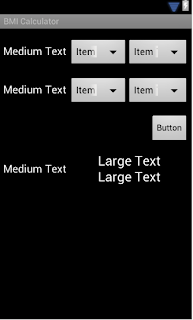 |
| Layout Arrangement (Portrait View) |
 |
| Layout Arrangement (Landscape View) |
Defining Strings in Widgets
To define strings that would be using as labels in widgets, we have two options. One is directly hard-coding them in the layout xml as text attributes. This approach is not recommended, because that will make difficult to localize your app. The recommended way is to use a separate file to keep your strings and refer them from widgets.
Android provide a file res/values/strings.xml in your project to store your strings.
Similar to main.xml (The Layout XML file), it also has a graphical editor and a xml editor to directly edit the file.
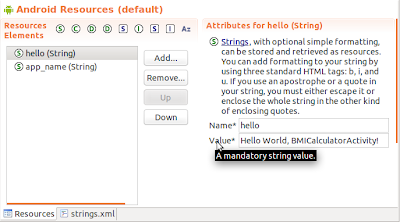 |
| strings.xml editor |
There will already be few strings added. Remove the strings with the name hello, by selecting it and pressing 'Remove..' button. The string 'app_name' is the name of your app. You can change the app name by changing this value. Now we will add strings using the visual editor. (Delete all the strings except 'app_name')
Press "Add.." button next to the strings list.
This will allow you to select the type of element you want to add. In fact we will create 'Color' and 'String Array type' elements for our app in the coming sections. We would first create a String for the first TextView named 'Weight'. Press OK after selecting the type as String. This will return to the strings.xml editor with a new String element added. On the right hand side space, fill a "name" and "value" for the String. The "name" can be used to refer to the string from the code and the UI. The "value" is the actual value displayed in the UI. For the first string we would use "weightLabel" as the name and the the "Weight" as the value as shown below.
Now click the strings.xml tab in the bottom of the panel and you can see the strings.xml content with the new string you just added.
<?xml version="1.0" encoding="utf-8"?>
<resources>
    <string name="app_name">BMI Calculator</string>
    <string name="weightLabel">Weight</string>
</resources>
For our app, we would be adding few more strings, string arrays and colors. Here is how it look like when all the required strings are added.
<?xml version="1.0" encoding="utf-8"?>
<resources>
    <string name="app_name">BMI Calculator</string>

        <!--  labels for widgets -->
    <string name="heightLabel">Height</string>
    <string name="calculateButton">Calculate</string>
    <string name="EmptyString"></string>
    <string name="weightLabel">Weight</string>
    <string name="bmiLabel">Body Mass Index</string>

     <!--  the BMI descriptions -->
    <string name="bmiNormal">Normal</string>
    <string name="bmiOver">Overweight</string>
    <string name="bmiUnder">Underweight</string>
    <string name="bmiSUnder">Severely Underweight</string>
    <string name="bmiObese">Obese</string>


    <!--  Strings arrays used in Spinner widgets -->
    <string-array name="heightUnitsArray">
        <item >feet/inch</item>
        <item >m/cm</item>

    </string-array>
    <string-array name="weightUnitsArray">
        <item >lb</item>
        <item >kg</item>
    </string-array>

    <!--  Colors used to used in the labels and the backgrouds -->
    <color name="colorRed">#ff0000</color>
    <color name="colorYellow">#00ffff</color>
    <color name="colorGreen">#00ff00</color>
    <color name="colorBG">#323232</color>

</resources>
Then we would modify the main.xml (The UI xml that we added widgets and layouts) to refer these strings for their labels. Here is the modified main.xml (the modifications are underlined) followed by the explanation.
<?xml version="1.0" encoding="utf-8"?>
<LinearLayout xmlns:android="http://schemas.android.com/apk/res/android"

    android:layout_width="fill_parent"
    android:layout_height="fill_parent"
    android:orientation="vertical"
    android:background="@color/colorBG" >

    <TableLayout
        android:id="@+id/tableLayout1"
        android:layout_width="match_parent"
        android:layout_height="wrap_content" >

        <TableRow
            android:id="@+id/tableRow1"
            android:layout_width="wrap_content"
            android:layout_height="wrap_content"
            android:layout_marginLeft="5dip"
            android:layout_marginRight="5dip"
            android:layout_marginTop="15dip" >

            <TextView
                android:id="@+id/textView1"
                android:layout_width="wrap_content"
                android:layout_height="wrap_content"
                android:layout_marginRight="5dip"
                android:text="@string/weightLabel"
                android:textAppearance="?android:attr/textAppearanceMedium" />

            <Spinner
                android:id="@+id/spinner1"
                android:layout_width="fill_parent"
                android:layout_height="wrap_content"
                android:prompt="@string/weightLabel"
                android:layout_weight="2" />

            <Spinner
                android:id="@+id/spinner2"
                android:layout_width="fill_parent"
                android:layout_height="wrap_content"
                android:layout_weight="1"
                android:entries="@array/weightUnitsArray" />
        </TableRow>

        <TableRow
            android:id="@+id/tableRow2"
            android:layout_width="wrap_content"
            android:layout_height="wrap_content"
            android:layout_marginLeft="5dip"
            android:layout_marginRight="5dip"
            android:layout_marginTop="15dip" >

            <TextView
                android:id="@+id/textView2"
                android:layout_width="wrap_content"
                android:layout_height="wrap_content"
                android:layout_marginRight="5dip"
                android:text="@string/heightLabel"
                android:textAppearance="?android:attr/textAppearanceMedium" />

            <Spinner
                android:id="@+id/spinner3"
                android:layout_width="fill_parent"
                android:layout_height="wrap_content"
                android:prompt="@string/heightLabel"
                android:layout_weight="2" />

            <RelativeLayout
                android:layout_width="match_parent"
                android:layout_height="wrap_content"
                android:layout_weight="1" >

                <Spinner
                    android:id="@+id/spinner4"
                    android:layout_width="fill_parent"
                    android:layout_height="wrap_content"
                    android:entries="@array/heightUnitsArray" />

                <Button
                    android:id="@+id/button1"
                    android:layout_width="wrap_content"
                    android:layout_height="wrap_content"
                    android:layout_alignRight="@+id/spinner4"
                    android:layout_below="@+id/spinner4"
                    android:layout_marginTop="15dip"
                    android:onClick="calculateClickHandler"
                    android:text="@string/calculateButton" />

            </RelativeLayout>
        </TableRow>

    </TableLayout>

    <LinearLayout
        android:id="@+id/linearLayout1"
        android:layout_width="match_parent"
        android:layout_height="wrap_content"

        android:layout_marginLeft="5dip"
        android:layout_marginRight="5dip"
        android:layout_marginTop="15dip"
        android:orientation="horizontal" >


        <TextView
            android:id="@+id/textView3"
            android:layout_width="wrap_content"
            android:layout_height="match_parent"

            android:layout_marginRight="5dip"
            android:gravity="center_vertical"
            android:text="@string/bmiLabel"
            android:textAppearance="?android:attr/textAppearanceMedium" />


        <LinearLayout
            android:id="@+id/linearLayout2"
            android:layout_width="match_parent"
            android:layout_height="wrap_content"

            android:orientation="vertical" >

            <TextView
                android:id="@+id/textView4"
                android:layout_width="match_parent"

                android:layout_height="wrap_content"
                android:gravity="center_horizontal"
                android:text=""
                android:textAppearance="?android:attr/textAppearanceLarge" />


            <TextView
                android:id="@+id/textView5"
                android:layout_width="match_parent"
                android:layout_height="wrap_content"

                android:gravity="center_horizontal"
                android:text=""
                android:textAppearance="?android:attr/textAppearanceLarge" />

        </LinearLayout>

    </LinearLayout>

</LinearLayout>
| To set the background color
|
We are changing "backgroud" attribute of the top most layout element to the "@color/colorBG". We defined the colorBG in the Strings.xml as a color.
|
| To set the texts of TextViews and Button
|
We are changing "text" attribute of the element (For example in the TextView1) to "@string/weight". We defined the 'weight' as a string in the Strings.xml |
| To change the background color
|
We are changing "entries" attribute of the element (For example in the Spinner2) to the "@array/weightUnitsArray". We defined the 'weightUnitsArray' (and its items) in the Strings.xml as a string array.
|
In addition to the above list, we have added "onClick" attribute to the button to handle the onClick action from the code. We would define calculateClickHandler method in our Activity class. This is all we have to do for the UI. Now we would move to the code to get the logic done.
The Code
As we have created a bit sophisticated UI, it takes some code to handle the required functionality shown in the UI. As we have created spinners to select the weight and height in two different units, first we have to load the spinners with necessary value ranges. And when the BMI is calculated, we show the BMI value, the text of interpretation of the BMI value in two text views and change the color of the text views according to the healthiness read in BMI value. Here is the code that we do all these. (The comments in the code will help you to understand the logic)
package com.blogger.android.meda.bmicalculator;

import android.app.Activity;
import android.os.Bundle;
import android.view.View;

import android.widget.AdapterView;
import android.widget.AdapterView.OnItemSelectedListener;
import android.widget.ArrayAdapter;
import android.widget.Spinner;
import android.widget.TextView;

public class BMICalculatorActivity extends Activity {

 /** Called when the activity is first created. */

 // declare adaptors to bind with spinners
 ArrayAdapter<String> heightFeetsAdapter;
 ArrayAdapter<String> heightMetersAdapter;
 ArrayAdapter<String> weightLibsAdapter;
 ArrayAdapter<String> weightKgsAdapter;

 // declare the references for the UI elements

 Spinner weightSpinner;
 Spinner heightSpinner;
 Spinner weightUnitSpinner;
 Spinner heightUnitSpinner;
 TextView bmiValueText;
 TextView bmiDescriptionText;

 @Override
 public void onCreate(Bundle savedInstanceState) {
  super.onCreate(savedInstanceState);
  setContentView(R.layout.main);

  // load the references to the widgets

  weightSpinner = (Spinner) findViewById(R.id.spinner1);
  weightUnitSpinner = (Spinner) findViewById(R.id.spinner2);
  heightSpinner = (Spinner) findViewById(R.id.spinner3);
  heightUnitSpinner = (Spinner) findViewById(R.id.spinner4);
  bmiValueText = (TextView) findViewById(R.id.textView4);
  bmiDescriptionText = (TextView) findViewById(R.id.textView5);

  // initialize the value range for the spinners

  initializeSpinnerAdapters();

  // load the default values for the spinners
  loadLibsValueRange();
  loadFeetsValueRange();

  // add listeners to the unit changes

  addListernsToUnitChanges();
 }

 // handler that we defined in "onClick" attribute of the button
 // get called when the button is clicked
 public void calculateClickHandler(View view) {

  // make sure we handle the click of the calculator button
  if (view.getId() == R.id.button1) {


   // get the users values from the spinners (converted to floats and
   // metrics units)
   float weight = getSelectedWeight();
   float height = getSelectedHeight();

   // calculate the bmi value and set it in the text

   float bmiValue = calculateBMI(weight, height);
   bmiValueText.setText(bmiValue + "");

   // interpret the meaning of the bmi value and set it in the text
   int bmiInterpretation = interpretBMI(bmiValue);
   bmiDescriptionText.setText(getResources().getString(

     bmiInterpretation));

   // color for the bmi text fields
   int bmiColor = colorBMI(bmiValue);
   bmiValueText.setTextColor(getResources().getColor(bmiColor));
   bmiDescriptionText.setTextColor(getResources().getColor(bmiColor));
  }

 }

 // retrieve the weight from the spinner control converted to kg
 public float getSelectedWeight() {

  String selectedWeightValue = (String) weightSpinner.getSelectedItem();
  if (weightUnitSpinner.getSelectedItemPosition() == 0) {

   // the position is libs, so convert to kg and return
   return (float) (Float.parseFloat(selectedWeightValue) * 0.45359237);
  } else {

   // already kg is selected, so no need to covert (just cast to float)
   return Float.parseFloat(selectedWeightValue);
  }
 }


 // retrieve the hight from the spinner control convented to me
 public float getSelectedHeight() {
  String selectedHeightValue = (String) heightSpinner.getSelectedItem();
  if (heightUnitSpinner.getSelectedItemPosition() == 0) {

   // the position is feets and inches, so convert to meters and return
   String feets = selectedHeightValue.substring(0, 1);
   String inches = selectedHeightValue.substring(2, 4);
   return (float) (Float.parseFloat(feets) * 0.3048)

     + (float) (Float.parseFloat(inches) * 0.0254);
  } else {

   // already meters is selected, so no need to covert (just cast to
   // float)
   return Float.parseFloat(selectedHeightValue);
  }

 }

 // the formula to calculate the BMI index
 // check for http://en.wikipedia.org/wiki/Body_mass_index
 private float calculateBMI(float weight, float height) {

  return (float) (weight / (height * height));
 }

 // returns the string name defined in strings.xml

 // that interpret the BMI
 private int interpretBMI(float bmiValue) {

  if (bmiValue < 16) {
   return R.string.bmiSUnder;
  } else if (bmiValue < 18.5) {

   return R.string.bmiUnder;
  } else if (bmiValue < 25) {

   return R.string.bmiNormal;
  } else if (bmiValue < 30) {

   return R.string.bmiOver;
  } else {
   return R.string.bmiObese;
  }

 }

 // returns the color name defined in strings.xml
 // that represent the BMI
 private int colorBMI(float bmiValue) {

  if (bmiValue < 16) {
   return R.color.colorRed;
  } else if (bmiValue < 18.5) {

   return R.color.colorYellow;
  } else if (bmiValue < 25) {

   return R.color.colorGreen;
  } else if (bmiValue < 30) {

   return R.color.colorYellow;
  } else {
   return R.color.colorRed;
  }

 }

 // adding listers to unit changing spinners, as we need to change the
 // value range accordingly
 public void addListernsToUnitChanges() {

  // listener to the weight unit
  weightUnitSpinner
    .setOnItemSelectedListener(new OnItemSelectedListener() {
     public void onItemSelected(AdapterView<?> parent,
       View view, int row, long id) {

      // load the relevent units and the values
      if (row == 0) {
       // libs is selected
       loadLibsValueRange();
      } else {

       // kg is selected
       loadKgsValueRange();
      }
     }

     public void onNothingSelected(AdapterView<?> arg0) {

      // Nothing to do here
     }
    });

  // listener to the height unit
  heightUnitSpinner
    .setOnItemSelectedListener(new OnItemSelectedListener() {

     public void onItemSelected(AdapterView<?> parent,
       View view, int row, long id) {

      // load the relevent units and the values
      if (row == 0) {
       // feets is selected
       loadFeetsValueRange();
      } else {

       // meters is selected
       loadMetersValueRange();
      }
     }

     public void onNothingSelected(AdapterView<?> arg0) {

      // Nothing to do here
     }
    });
 }

 // load the libs value range to the weight spinner
 public void loadLibsValueRange() {

  weightSpinner.setAdapter(weightLibsAdapter);
  // set the default lib value
  weightSpinner.setSelection(weightLibsAdapter.getPosition("170"));
 }


 // load the kg value range to the weight spinner
 public void loadKgsValueRange() {
  weightSpinner.setAdapter(weightKgsAdapter);
  // set the default vaule for kg

  weightSpinner.setSelection(weightKgsAdapter.getPosition(" 77"));
 }

 // load the feets value range to the height spinner
 public void loadFeetsValueRange() {

  heightSpinner.setAdapter(heightFeetsAdapter);
  // set the default value to feets
  heightSpinner.setSelection(heightFeetsAdapter.getPosition("5\"05'"));
 }


 // load the meters value range to the height spinner
 public void loadMetersValueRange() {
  heightSpinner.setAdapter(heightMetersAdapter);
  // set the default value to meters

  heightSpinner.setSelection(heightMetersAdapter.getPosition("1.65"));
 }

 // load the value range of all the units to adapters
 // we would assign adapters to the spinners based on the users selection

 public void initializeSpinnerAdapters() {

  String[] weightLibs = new String[300];
  // loading 1.0 to 300 to the weight in libs

  int k = 299;
  for (int i = 1; i <= 300; i++) {

   weightLibs[k--] = String.format("%3d", i);
  }

  // initialize the weightLibsAdapter with the weightLibs values
  weightLibsAdapter = new ArrayAdapter<String>(this,
    android.R.layout.simple_spinner_item, weightLibs);

  String[] weightKgs = new String[200];
  // loading 1.0 to 200 to the weight in kgs

  k = 199;
  for (int i = 1; i <= 200; i++) {

   weightKgs[k--] = String.format("%3d", i);
  }

  // initialize the weightKgsAdapter with the weightKgs values
  weightKgsAdapter = new ArrayAdapter<String>(this,
    android.R.layout.simple_spinner_item, weightKgs);

  String[] heightFeets = new String[60];
  // loading 3"0' to 7"11' to the height in feet/inch

  k = 59;
  for (int i = 3; i < 8; i++) {

   for (int j = 0; j < 12; j++) {
    heightFeets[k--] = i + "\"" + String.format("%02d", j) + "'";
   }

  }
  // initialize the heightFeetAdapter with the heightFeets values
  heightFeetsAdapter = new ArrayAdapter<String>(this,
    android.R.layout.simple_spinner_item, heightFeets);

  String[] heightMeters = new String[300];
  // loading 0.0 to 2.9 to the height in m/cm

  k = 299;
  for (int i = 0; i < 3; i++) {

   for (int j = 0; j < 100; j++) {
    heightMeters[k--] = i + "." + j;
   }

  }
  // initialize the heightMetersAdapter with the heightMeters values
  heightMetersAdapter = new ArrayAdapter<String>(this,
    android.R.layout.simple_spinner_item, heightMeters);

 }

}
Run it on the Phone
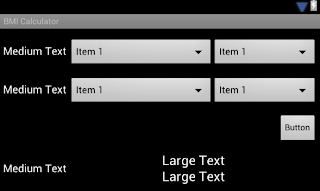
After all these done, we are here to run this app on the phone and check how the UI looks in both portrait and landscape mode.
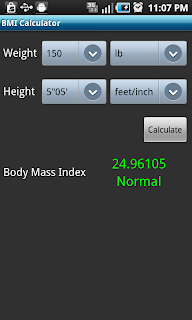 |
| The BMI Calculator look and feeling in Portrait view |
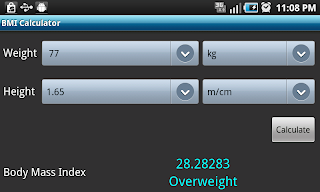 |
| The BMI Calculator look and feeling in Landscape view |
You can download the eclipse project and the android app that we created in this post from following links.
Next Steps
To add themes to the app for a better look and feel, read
Tutorial: Theming an Android App.


